INSTALLATION AND LOGIN
Simple instructions on how to install the Anatomyka app on your mobile phone or computer can be found on this page
USER INTERFACE OVERVIEW
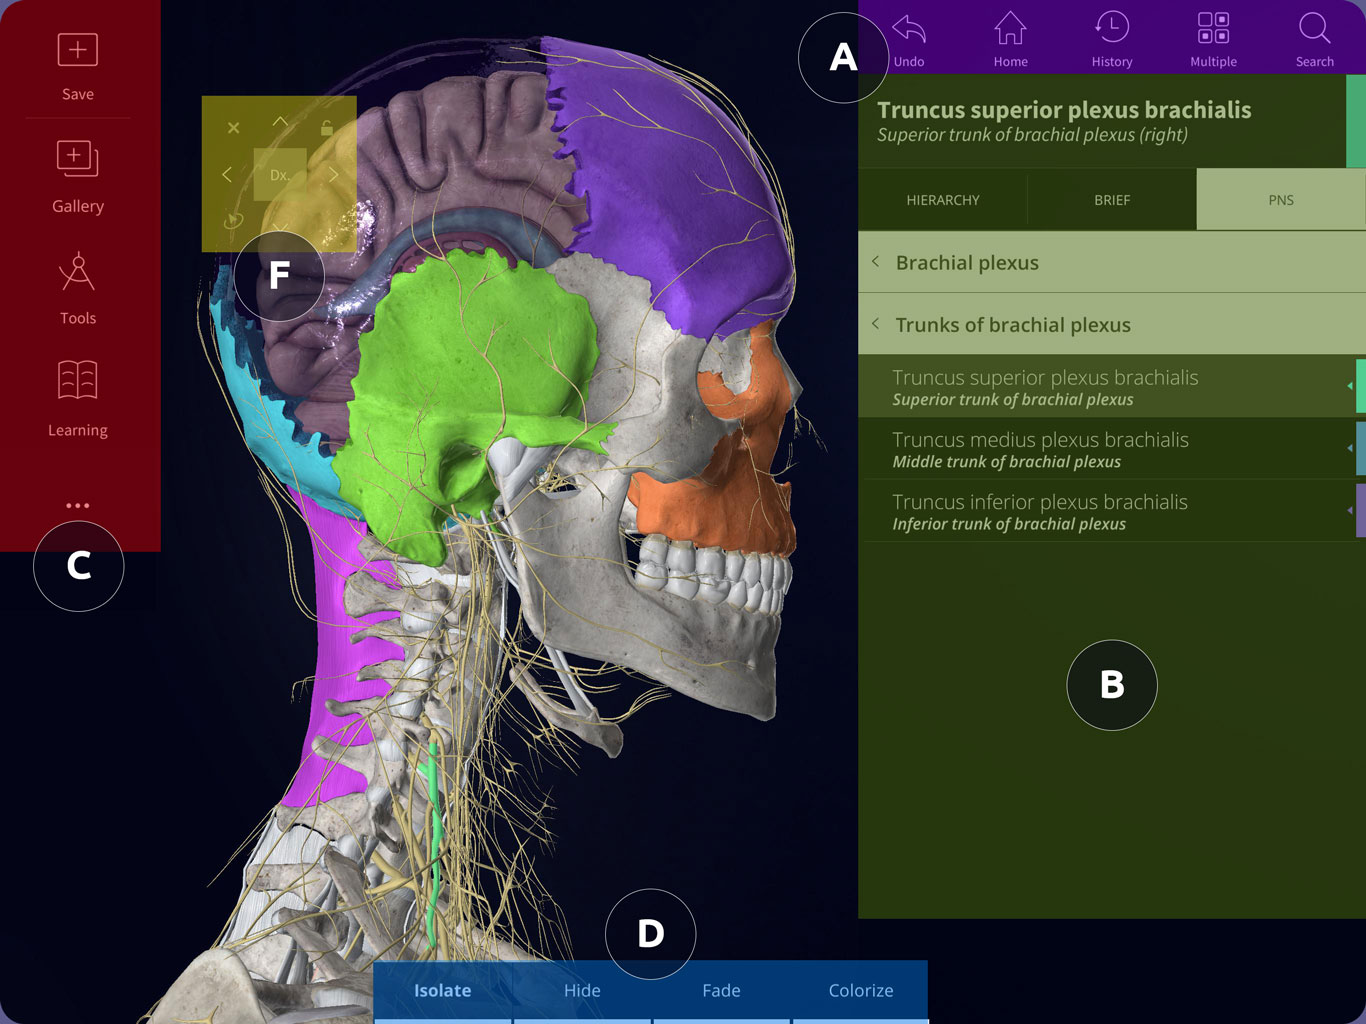
- A. TOP PANEL – simplifies working with the scene and organs.
- B. INFO PANEL – information about the selected organ, its position in the hierarchy, and its associated organs
- C. MAIN PANEL – other tools are placed here, which expand the possibilities of the application. Possibility to modify application and user account settings.
- D. ORGAN VISUALIZATION PANEL – visual adjustments of selected organ.
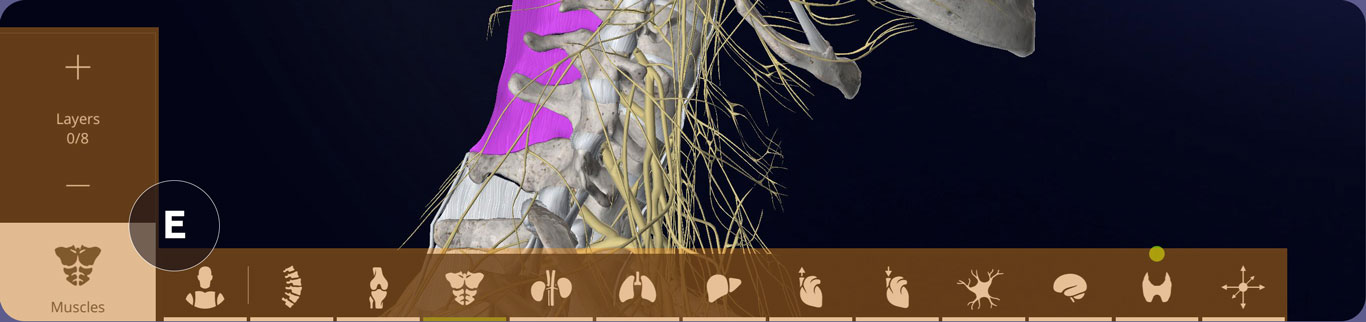
- E. PANEL OF ANATOMICAL SYSTEMS – possibilities of displaying individual systems by layers as well as regions of the human body
- F. 3D NAVIGATOR – simplification of work with the camera view (only ACADEMIC PRO)
TOP PANEL

UNDO – one step back. More clicks means more steps back
HOME – restore the opening scene with the skeletal system
HISTORY – History of selected organs
MULTIPLE – if this panel is active you can select 1 or more organs
– SELECTION – selects the organ within the green area
– DESELECTION – deselects the selected organ within the red area
– SELECT ALL COLORED – automatically selects all colored organs
SEARCH – searches for an organ, region or structure based on an inserted string
– Pin icon – region or area
– Multiple icon – organ structure or compound organ
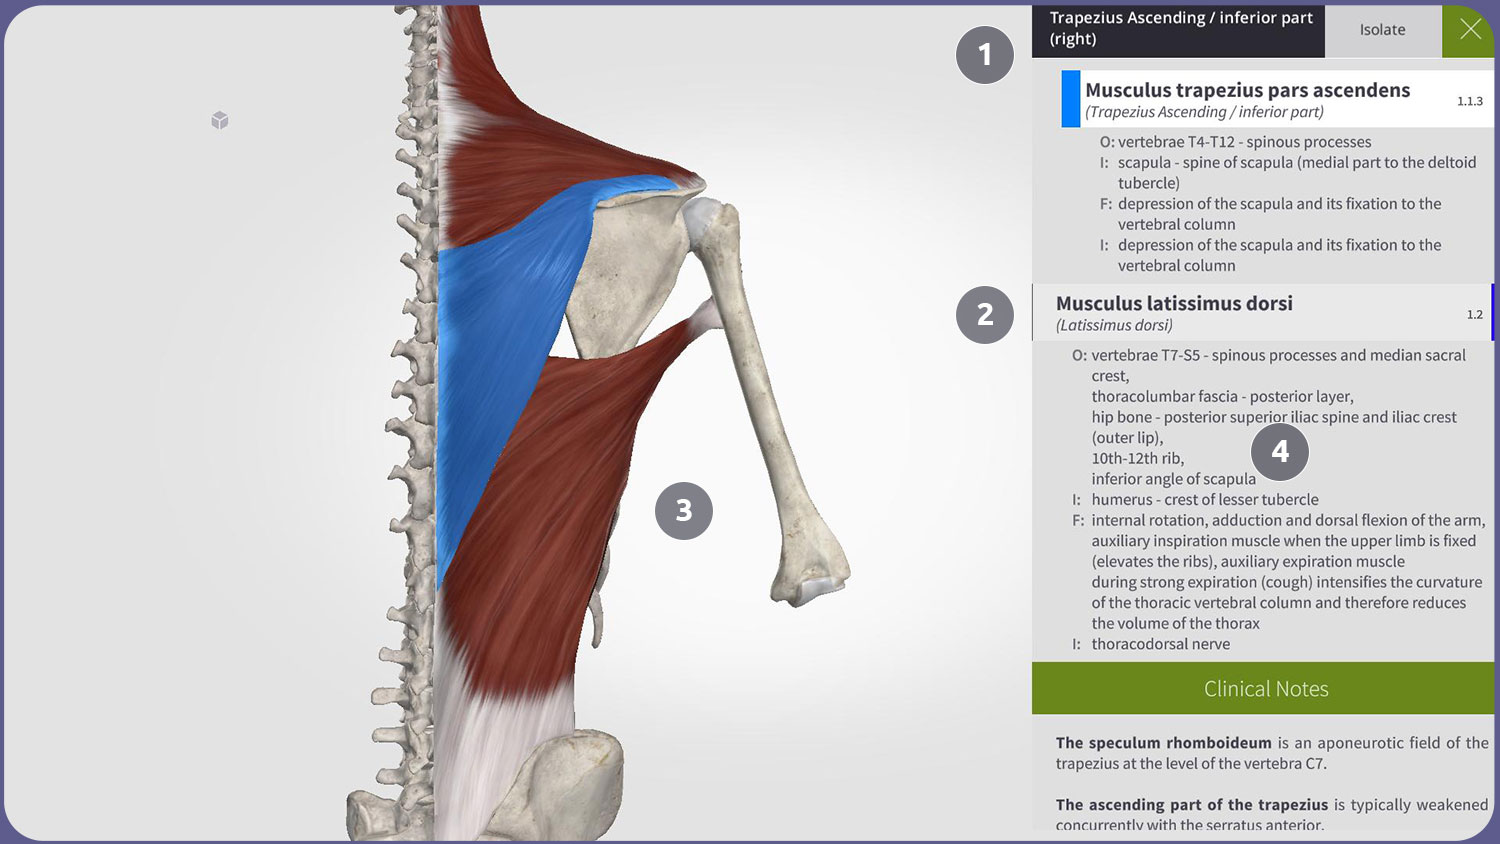
INFO PANEL
This panel displays all the information about the selected organ.
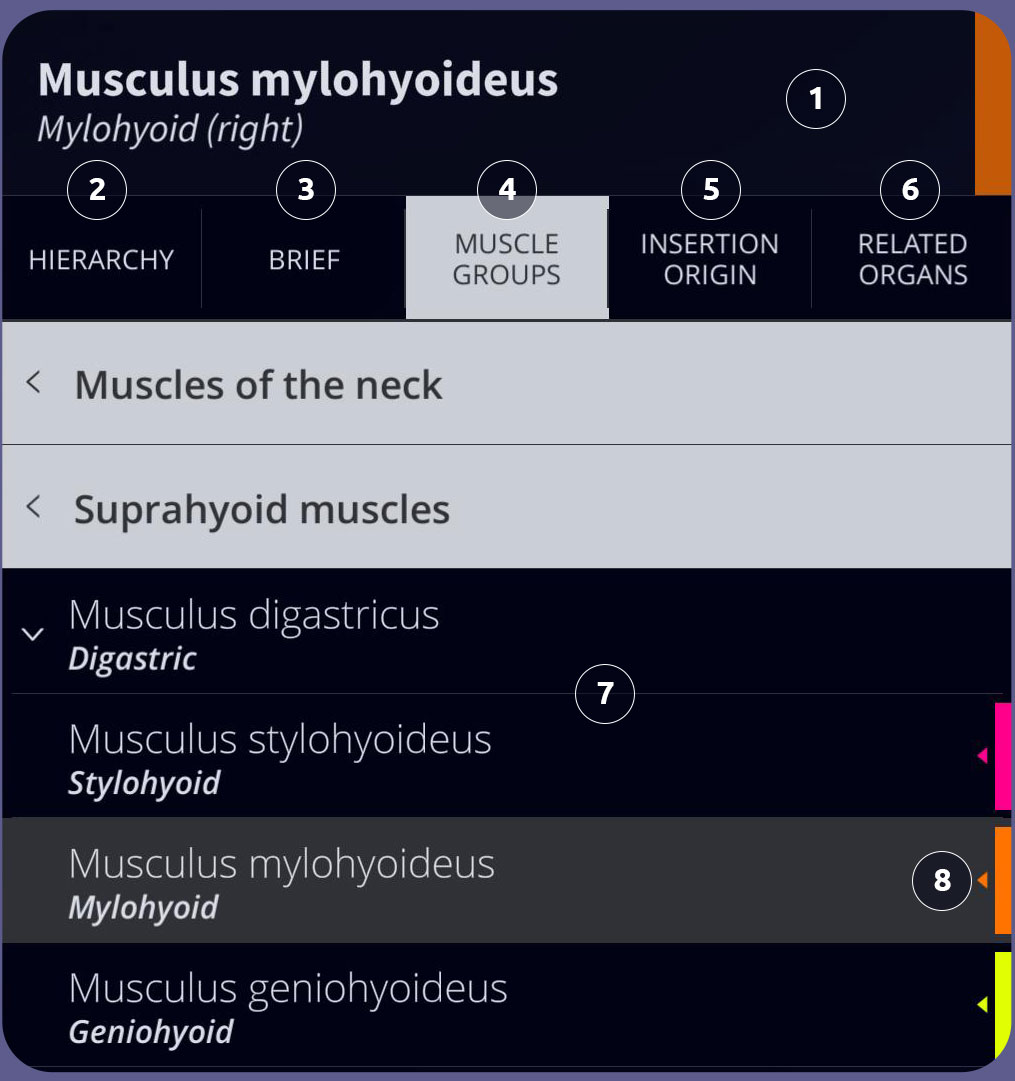
- NAME– the name of the organ is in the chosen language and in the Latin equivalent. The color bar indicates the preset color of the organ.
* you can change the language in the settings in the main panel - HIERARCHY – shows the level in which the organ is in the given system. You can also select organs in the higher levels.
- BRIEF INFO– brief description of the organ, basic properties with clinical notes. Along with the organ, the organs that are on the same level in the given system are also displayed. These organs can be also selected in case there is a colored strip next to them.
- SYSTEM GROUP – all organs of the system of which the organ is a part are grouped here, exactly according to the anatomical hierarchy. It is possible to move around in the hierarchy and switch between the organs in the system tree.
- PARTS/SURFACES and INSERTIONS/ORIGINS – this panel is displayed only for muscles and bones. It shows the parts and regions of bones as well as insertion and origins of muscles.
- RELATED ORGANS– here you can view related organs of selected organ. This includes blood supply, innervation and syntopy.
Organs can be displayed both as a group and individually and are displayed in color to make them easier to distinguish. - INFORMATION PANEL – all informations are displayed here. You can scroll through the results by scrolling in the text or by navigating in the hierarchy
- COLORS – use this button to colour the organ
MAIN PANEL
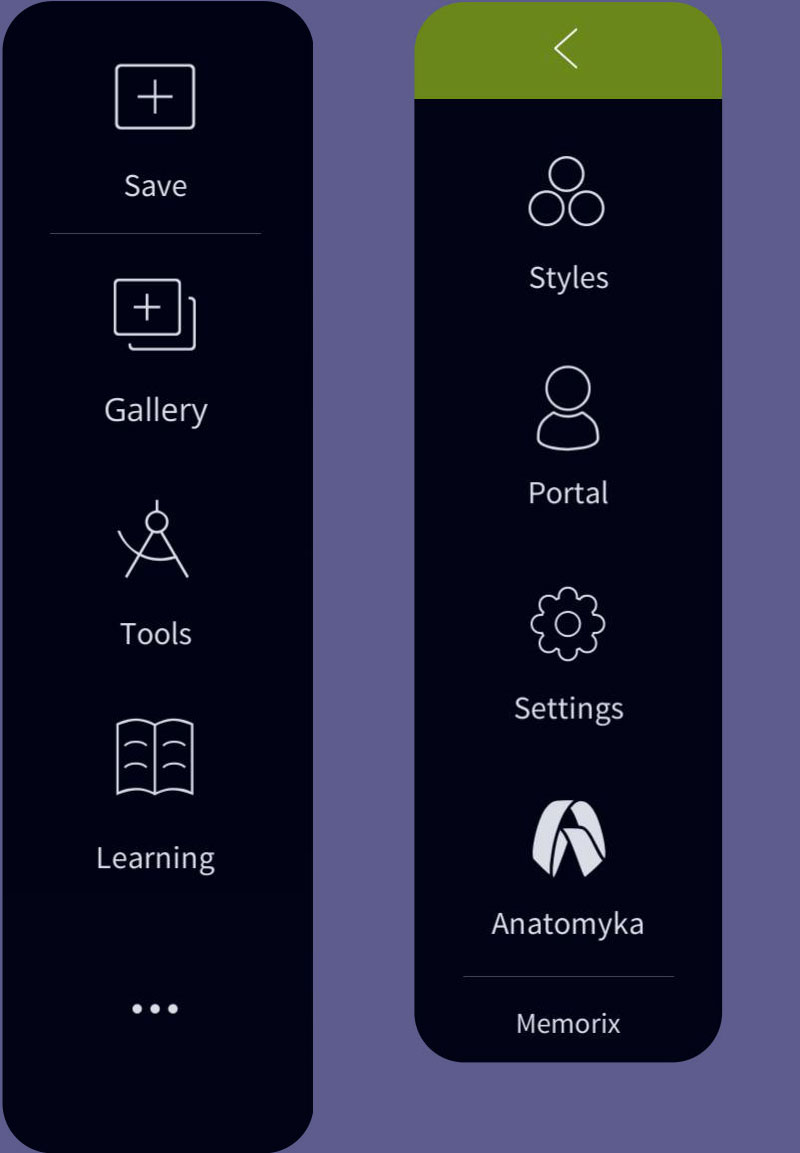
- E-POSTER GALLERY & SAVE – Choose an e-poster from the gallery or save screen to the e-poster gallery. More in the E-poster gallery panel
- TOOLS – you can create labels for organs, interactive buttons, use a pen or insert an image. More in the tools panel
- LEARNING – use the simplified screen with the text for learning with interactive organ names. More in the learning panel
- STYLES – choose the visual style of the app

- PORTAL – information about your account
- SETTINGS
– APP LANGUAGE – choose your preferred language
– GRAPHICS QUALITY SETTINGS – choose the graphic quality
– KEYBOARD SHORTCUTS

E-POSTER GALLERY
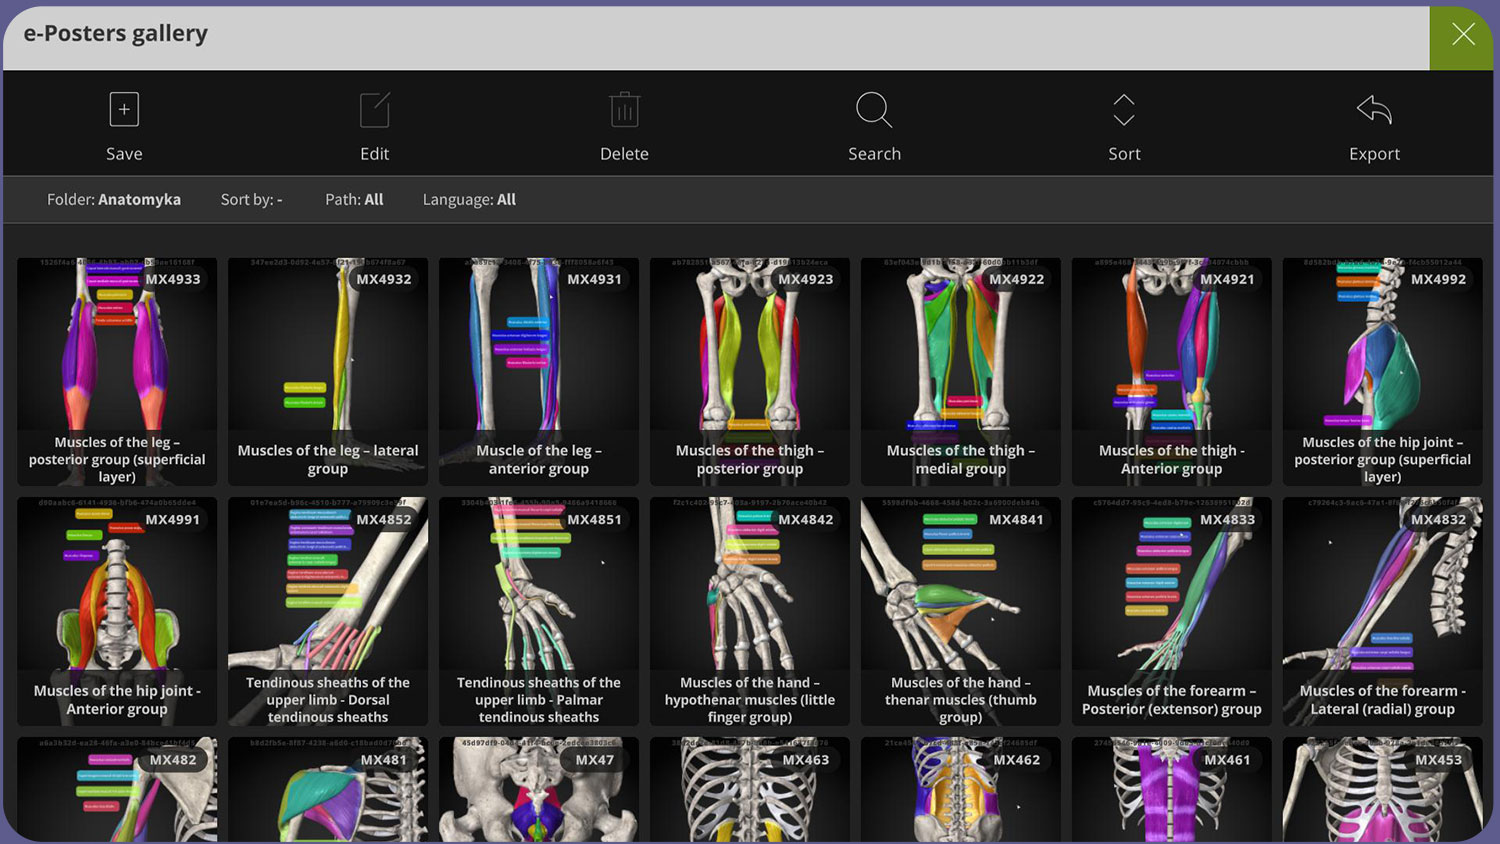
- SAVE – Save the screen to the gallery. When saving it is necessary to enter the NAME, DESCRIPTION. You can SELECT or CREATE a folder where the e-poster will be saved.
- EDIT – you can edit the NAME and DESCRIPTION of the e-poster. This is only possible for e-posters you have created.
- DELETE – delete e-posters from the gallery.
- SEARCH – search for e-posters according to the specified string. For MEMORIX e-posters it is possible to enter the ID according to the chapter in the book.
- SORT – choose which e-posters should be displayed in the gallery.
TOOLS
DELETE TOOLS – remove all tools from the scene
HIDE TOOLS – hides all tools in the scene
HOVER LABELS – colorize organ and his Latin name over which the mouse cursor is hovering. Switches with the “space” key. One click displays only the organ name, second click disables the function.
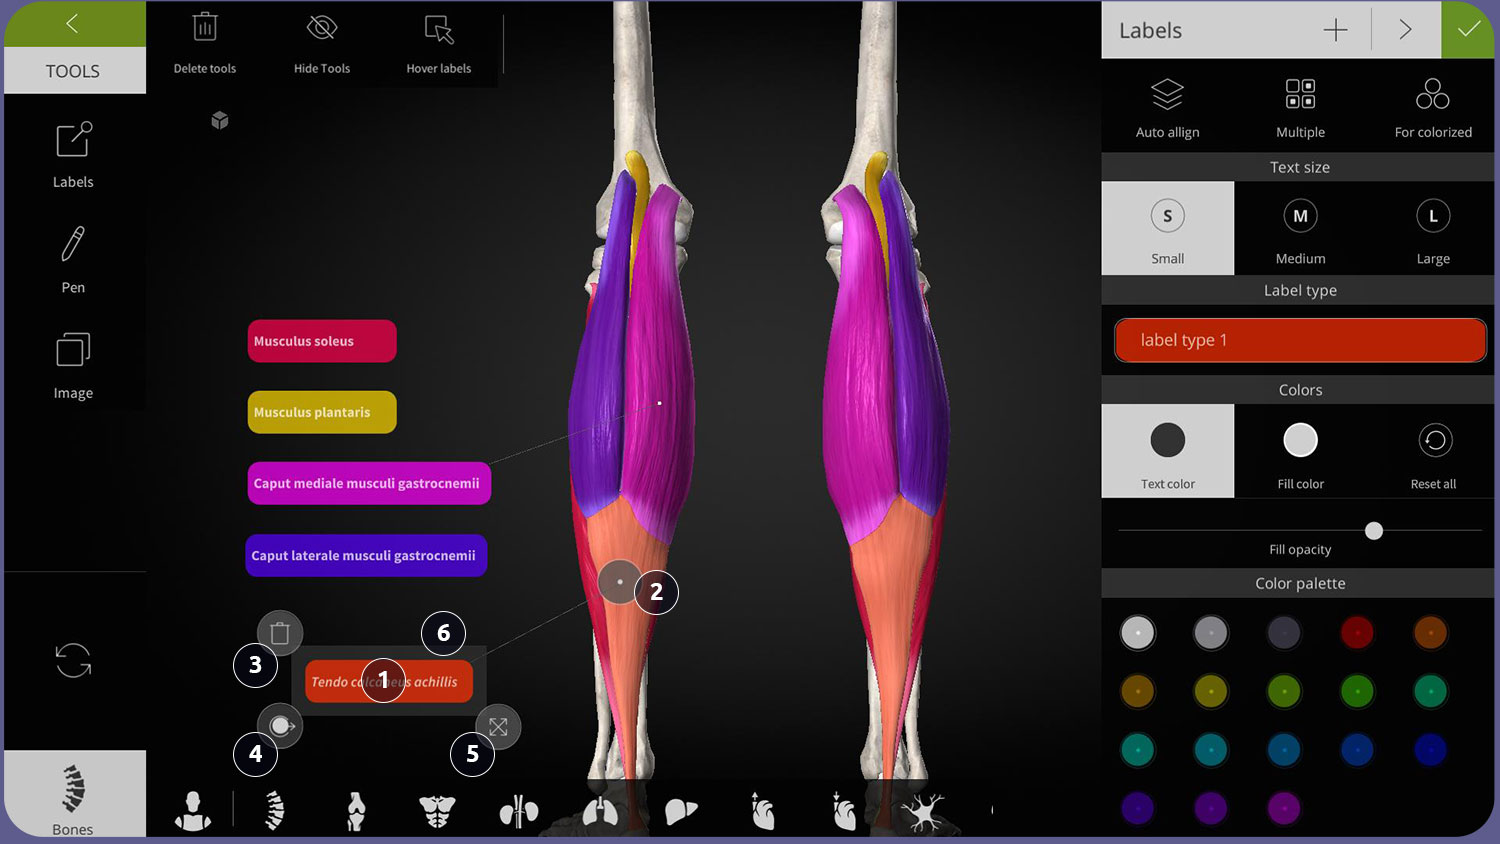
LABELS
(keyboard shortcut L)
AUTO ALIGN – aligns all labels to the right side
MULTIPLE – adjusts selected labels at once
FOR COLORIZED – automatically assigns labels to all colored organs
LABEL EDITING
1. TEXT – this content can be changed. In case you want to find out the name of the organ, just move the anchor (2) to the organ.
2. ANCHOR – the anchor is automatically attached to the organ. Click on it to disconnect the anchor from the organ. If you put the anchor on another organ, the name of the organ will be automatically entered in the label.
3. DELETE LABEL
4. COLORIZE – the organ is colored with the color of the label
5. RESIZE – increase the area of the label
6. MOVE – by clicking on the area around the label you can move the label
PEN
You can draw into the screen. You can choose the colour as well as the size of the pen. (keyboard shortcut P)
IMAGE
Inserting the image into the scene.
! This image is not saved with the scene in the e-poster gallery !
LEARNING
The LEARNING panel is divided into two parts. In the left part there is a 3D model of the human body and in the right part there is a list of organs with descriptions. The chapter in which the organ is located is displayed. Clicking on an organ in the list will automatically mark the organ on the 3D model.
- Name of the organ – click on it to get information about the organ.
- Organ names in the list – you can select each organ that has an assigned color. When clicked, it will also be marked on the 3D model.
- 3D model of the human body – all organs in the chapter are shown here together with the associated organs.
- Chapter content – the content starts with a list of subchapters. Clicking on it will take you to the selected subchapter. There is also a list of organs together with descriptions and clinical notes.
ORGAN VISUALIZATION PANEL

- ISOLATE – displays the organ together with the surrounding bones
- HIDE / HIDE OTHERS – hides the selected organ. If multiple organs are selected, the unselected organs are hidden.
- FADE – shows the selected organ
- COLORIZE – colors the selected organ. In the “Colorize” menu it is possible to select a different organ color or to color all selected organs.
ANATOMICAL SYSTEMS PANEL
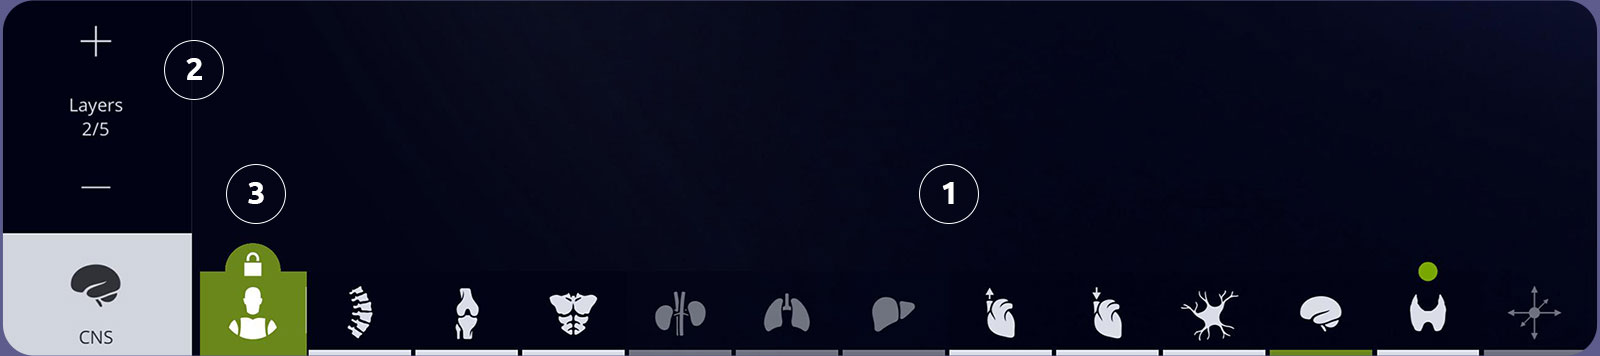
- ANATOMICAL SYTEMS – select the system you want to work with
- LAYERS – here you can add or remove layers.
! By clicking on the system icon you can hide this panel. - REGIONS– here you select the regions you want to work with. It is always possible to select only neighboring regions. After marking, only organs in the marked region are displayed.
3D NAVIGATOR
The 3D navigator is a useful tool that allows you to control camera angles with a simple click.
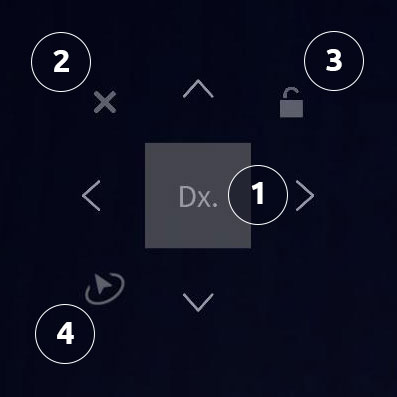
- 3D CUBE WITH ARROWS – click on the arrow to rotate the object by 90°. Click on the face of the cube to rotate the object with this face towards you.
- HIDE 3D navigator
- LOCK current view. It is not possible to rotate the object at this stage.
- ORBIT FEATURE – with this function you can move the camera to the loop in the direction of the cursor movement. Default is off. The function is active for the first three seconds while holding the left mouse button. During this time interval, move the cursor quickly in the desired direction and release the mouse button. The camera smoothly rotates + – 60° back and forth around the selected object. Click on the screen to cancel the rotation.
FAQ
If you didn’t find what you were looking for, you will find the answers to all your questions here.